Do you know your bicycle measurements? I’m not just referring to the size of your frame, but the position of key components like your pedal cleats, saddle and handlebars and how you, as a rider, actually fit on them and your bicycle.
Bicycle fit plays an important role in a cyclist’s enjoyment, performance, and health. A bike that isn’t the right size or adjusted improperly is not only uncomfortable to ride, but can also cause injury.
Even if you are in the dark about what to measure and how, you can quickly learn how to figure out your current bicycle’s position. With the numbers we are going to measure together, you can compare them to any future bicycle and immediately know if it’s going to be a good fit. Let’s go.
Professional Bike Fit Systems
Bicycle price tags are reaching some eye watering levels these days, so good for you if you’ve worked with a bicycle fit professional to get the most out of your investment. If you’ve had a professional bike fit, then you should have received a printout with some of the same numbers we are going to explore. But stick with us as you can learn more about what they mean, how they were calculated, and why it’s important.
Knowing your measurements comes in handy when purchasing a new bike, adjusting one back to your fit after loaning it to someone, or making adjustments to any bicycle you may rent on your next cycling vacation. Imagine not having to hassle with bringing your bike with you yet being able to ride a quality bicycle that fits you properly? Yours stays safe and sound at home, free of any risk of damage or being lost in transit.
If you’ve been riding your entire life and have never had a professional bike fit, then maybe now is the time. A few minor adjustments can make all the difference in how you feel and perform. Bike fit systems vary, and one is not better than the other. The most important thing to research is the experience of the professional doing the fit, their certifications, and hopefully, some direct feedback from previous clients. A follow-up visit is standard practice.
Even if you think you have the right position on your bike, going to a professional can only confirm your belief, or boost your performance to the next level. What do you have to lose? It’s an investment in yourself. If an expert bike fit doesn’t interest you or is out of your budget, you can still do a DIY fit at home. Here are a few of the professional bike fit systems available today.
- Retül. Uses 3D motion capture technology to measure every movement, down to the degree and millimeter.
- Precision Fit is part of the Trek brand. Emphasis is placed on rider goals, needs, and preferences
- Guru. Guru uses their proprietary dynamic fit jig and software to find your ideal bike size and riding position.
- Bike Fit. Shimano owned and run, it uses anatomical alignment to find your ideal position and comfort.
- Velogic uses high-tech motion capture analysis of a rider in motion, focusing on key metrics to interpret the relationship between rider physiology and bike geometry.
Critical bike measurements
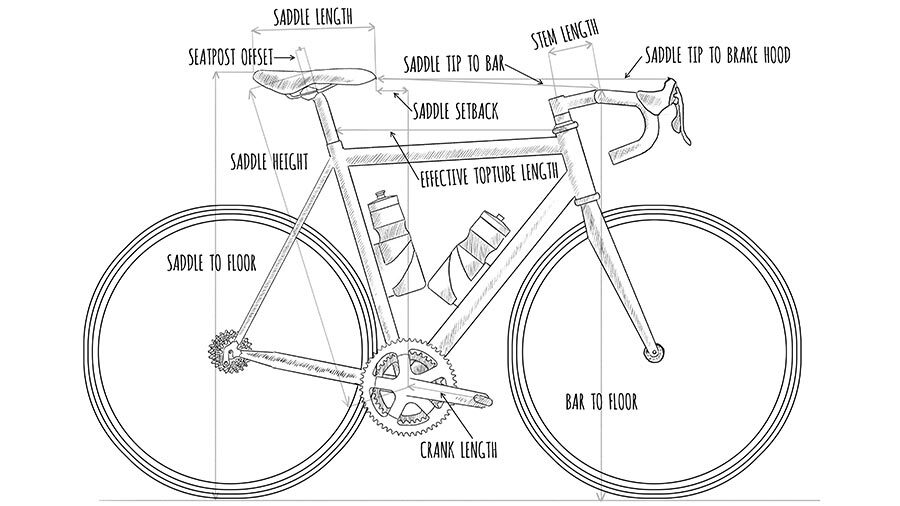
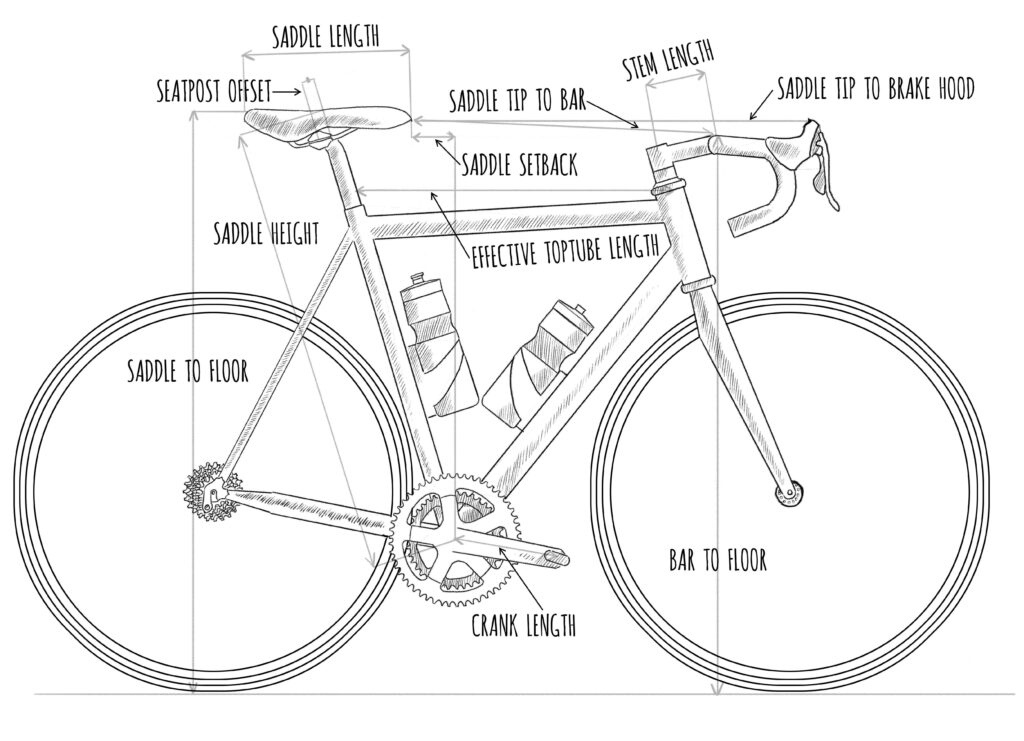
If you have no bike fit data to guide you, take your own critical bike measurements. There are five in total. Once you know your numbers, you can translate them onto any other bike and know if it will fit or not. Let’s learn how it’s done. You’ll need a level, tape measure, pen and paper.
Saddle height
Take this assessment with the bike on the floor or in a stand. If measuring on the floor, have a helper hold your bicycle straight, or lean it right up against a wall and use your level to make sure it’s perfectly parallel to it. The goal is to be as accurate as possible.
To calculate your saddle height, measure from your bottom bracket to the top of your saddle. Do not use the saddle rails as a reference in case you change to a different model or brand in the future. The total height won’t change, but the height of any new saddle might.
If you plan on swapping out crank arm length or pedals in the near future, place your current crank arm in line with the seat tube with the pedal toward the floor. Now measure from the pedal platform to the top of the saddle. Once you’ve changed your cranks, move the saddle up or down equal to the difference in crank length.
Saddle setback
Knowing your saddle setback helps determine how your body weight is distributed on the bike. It’s the measured distance between the front of the saddle and the center of the bottom bracket. To calculate your saddle setback, there should be a 90° angle between the floor and a vertical surface like a wall. Place your bicycle’s rear wheel perpendicular to the wall. Ask for help if you need someone to hold it in place.
Now measure horizontally from the center of the bottom bracket to the wall, and then from the tip of the saddle to the wall. Use your level to make sure the tape measure is parallel to the floor for both calculations, or use a laser measuring tool if you have one. Subtract the top from the bottom to give you your saddle setback.
Handlebar height
This measurement uses the saddle as the reference point, so be sure yours is correctly positioned before you go any further. To get your handlebar height, we first need to measure handlebar drop, which is the difference in height between your saddle and handlebars. Their position determines if you ride more upright, or lower, in a more aero position, like the pros.
Measure from the top of your handlebars (where they connect to the stem) down to the floor, and then from the top of the saddle to the floor. Subtract the first from the second and you have your handlebar drop.
Another method is by using a level if it is long enough. Place the level on the saddle (your saddle should be level anyway!) and extend it over the front of the handlebars. Then measure the distance between the level and the top of your handlebar. The bicycle has to be on a level ground for an accurate measurement in both methods.
Handlebar reach
Handlebar reach is the measured distance from the tip of the saddle to the top of the handlebars. Handlebar reach varies with different saddles, and you won’t know if a new saddle works for you or not until you try it out on the road. So if you are on someone else’s bike, this is one metric you may have to play with a bit to nail it.
Stack and reach
Stack and reach are the best way, from a distance, to know if a frame will fit you or not. To get your current bicycle’s figures, look up the frame geometry online or try using Geometry Geeks. No luck? We’ve got another way.
Back to the wall. Measure from the center of the bottom bracket to the wall, and then again from the center of the bottom bracket to the floor. This gives us the origin of our reach and stack measurements. Then measure from the top of the headtube down to the floor and subtract the bottom bracket height to calculate your stack.
Next measure from the top of the headtube back to the wall and subtract the bottom bracket to the wall figure to get your reach. Now you’ve got your bike fit numbers for your current position and can objectively compare them to any bike on the market. Your perfect fit isn’t for life, it changes with age, weight, injury and your cycling goals. Just take new measurements if you’ve changed your position down the road.